Setting Up Surveys
•Configuring the Survey Frequency and Sending the Survey
•Working with the Survey Metric View
About Surveys
Customer surveys measure customer satisfaction with the various departments in your organization. Surveys are published over the web, and distributed by email. When opened, they appear in a new browser window.
By default, a Service Desk Manager can view survey results within the business layouts. See Viewing Survey Results.
Incident and service request survey notifications are generated for every fifth record. This is implemented with the workflow and is controlled by a global constant. For information about when the surveys are sent, see Configuring the Survey Frequency and Sending the Survey.
Creating a Survey
1.From the Configuration Console, click Configuration > Communication Templates > Surveys to open the Surveys workspace. The survey list appears.
2.Click Create a new survey. The Create Survey form appears.
3.Enter information into the fields.
| Field | Description |
|---|---|
|
Survey title |
A unique title for the survey. This name is saved as a global constant for use when creating a link in a survey notification email. This name is displayed as a header on each page of the survey. |
|
Survey type |
on-demand (The only survey type available in Neurons for ITSM). |
|
Logo (URL) |
Shows your company logo on the survey. Insert the logo local web server path or public URL. For example, a local survey web server path is ../templates/images/logo.png and a public URL is http://www.mycompany.com/logo-small.gif. |
|
Style |
The color style to apply to the survey. |
|
Description |
Optional. A description of the survey. Appears as a tool tip for the survey title on the survey list page. |
|
Welcome message |
Optional. A message to greet the survey taker. Appears on the welcome page of the survey. |
|
Thank you message |
A message to display when the survey is submitted. If the respondent tries to resubmit a survey, the thank you message appears as a reminder that the survey has been previously submitted. |
|
Suspend message |
The message that appears if the survey is suspended (unpublished). |
|
Expired on |
The survey expiration date. Enter a date or click the calendar. |
|
Expiration message |
The message that appears if the respondent attempts to submit a survey on or after the expiration date. |
4.Click Save. The blank survey appears.
The following command items are available on the survey:
| Command | Description |
|---|---|
|
survey list |
Returns to the survey list page. |
|
copy survey |
Duplicates the current survey. |
|
survey properties |
Displays the basic survey properties described above. |
|
delete survey |
Deletes the current survey. This action can not be undone. |
|
add question |
Adds a question to the survey. |
|
preview |
Shows what the user encounters. |
Adding Survey Questions
1.From the Configuration Console, click Configuration > Communication Templates > Surveys to open the Surveys workspace. The survey list appears.
2.To add questions to the survey, click Add question. The Add Question form appears.
3.Enter information into the fields.
| Fields | Description |
|---|---|
|
Question Type |
The question type format. Select from the drop-down list. Text: The respondent can enter a short, one-line answer. Essay: The respondent can enter a long answer; this is essentially a comments field. Radio button: The respondent can only select one answer. Checkbox: The respondent can select multiple answers. |
|
Question |
The survey question. |
|
Answer Required |
Specifies if the user must respond to the question. |
|
Question Category |
The question category. Choose from the drop-down list. |
|
Answers |
This field is used for radio button or checkbox questions. Enter the response choices in the Answers field. Each line in the answer box represents an answer option, so press Enter to start a new line for each response.
For example, for a radio button or checkbox, you can enter: Excellent [weight=5] Very Good [weight=4] Good [weight=3] Fair [weight=2] Poor [weight=1] Don't Know/Not Applicable [weight=5] Or for a Yes/No or True/False response for a radio button or checkbox, you can enter: Yes [weight=1] No [weight=0] |
|
Last answer contains text box |
Provides a short answer field as a final response option. For example, this might contain an "other" option or a comment box). |
4.Click Save.
5.Repeat these steps to add more questions to the survey.
The questions appear as you add each one.
6.Click insert page break to create a page break between questions.
7.Click insert question to place a question between two existing questions.
8.After all questions have been entered and you are ready to publish the survey, go to the survey list and click Start.
9.To suspend a survey, click Stop.
Question Categories
1.From the Configuration Console, click Configuration > Communication Templates > Surveys to open the Surveys workspace. The survey list appears.
2.Click the Question Categories list to add general groupings for use in sorting survey data.
3.Enter question categories in the fields provided, such as Courtesy or Timeliness of Resolution. These categories are available when adding questions to a survey. If a category is used, it appears in the Used list on the Question Categories page.
You cannot delete a question category if it is used on an active survey.
4.To add a category, click Add.
Duplicating a Survey
1.From the Configuration Console, click Configuration > Communication Templates > Surveys to open the Surveys workspace. The survey list appears.
2.Click the name of the survey to copy. The survey opens.
3.Click copy survey at the top of the page. The Source survey field confirms that the survey is being copied.
4.Enter information into the fields.
| Field | Description |
|---|---|
| New survey title | A name for the new survey. |
| New survey description | Optional. A description for the new survey. The description appears as a tool tip when you move your mouse over a survey title on the Survey List page. |
5.Click Copy. The new survey opens.
6.Make changes to the questions and survey properties.
7.Click Save.
About Modifying a Survey
You cannot edit a survey after responses have been received for that survey. If you clear the responses, you can then edit the survey.
Within the survey page, you can perform the following actions:
| Action | Description |
|---|---|
| Edit | Edits a question on the page; to the right of the question. |
| Sort | Changes the order of the questions; to the right of the question. |
|
Move Up Move Down |
Repositions the order of the questions. |
| Remove | Deletes a question from the survey. Click OK to confirm. |
| Remove Page Break | Removes the page break to the right. |
| Add Question |
Adds a question to the end of the survey. Click the link at the top of the page.
To add a question to a specific location in the survey, click Insert Question at the bottom of each question segment. |
| Survey Properties | Edits the survey properties (such as survey type, welcome message, etc.). |
| Copy Survey | Copies the open survey. |
| Delete Survey | Deletes the open survey. |
| Preview | Shows a preview of the open survey. |
| Survey List | Returns to the Survey List page. |
If the survey has responses, you do not see a Delete Survey link. You must first delete the responses from the database by clicking Clear on the survey list page.
Creating Multiple Surveys
In certain instances you may need to create more than one survey. For example, two Incident surveys or two Service Request surveys that target different types of users or categories. In these cases use the following process and modify the Global Constant and/or the workflow depending on your requirements:
1.Log in to the application using the Administrator role, and click Configure Application to open the Configuration Console.
2.Create a new survey using the steps in Creating a Survey. Note the Survey title since you will need it later.
3.From the Configuration Console click on Build > Global Constants. Select one of the two following methods to point to the survey in order to send it.
To Replace an Existing Survey With a New Survey
The following example uses the name New Survey as the name of the new survey:
1.Edit the Value column for the DefaultSurveyName to reference the Survey title of the new survey. In this instance the new survey (New Survey) will replace the Value of the previous survey within the existing Global Constant. This allows the DefaultSurveyName within the Body of the workflow template to send the newly created survey.
No further changes are required.
To Run Two Simultaneous Surveys for a Single Business Object.
This procedure uses the Incident business object as an example. The procedure and example, describes how to run two simultaneous surveys for a business object but you can add more using the same basic procedure.
Use the following procedure only after you have created the new survey/s.
1.Create a new Global Constant or, create new Global Constants for each new survey.
Use the Survey title of the new surveys in the Value field. The Value field must match the name of the survey exactly or the survey will not be "linked". See Creating a Global Constant.
2.Edit the survey workflow for the appropriate business object, in this case the Incident business object, to insert two If statements. Each If statement will reference one of the 2 surveys. See Using Workflows, see also Modifying a Workflow Instance.
| a. | Open the Incident survey workflow, from the Configuration Console go to Build > Business Objects > Business Object Incident > Workflow. |
| b. | Click Incident Survey from the list. |
If the workflow has a lock icon you may not be able to edit it. In which case, create a new workflow and duplicate the information in the Notification block for the new workflow.
| c. | At the Workflows:Incident Survey page scroll to the Actions column on the right and click the  icon to edit the workflow. icon to edit the workflow. |
3.From the left pane select Blocks > Controls > If and drag the control onto the workflow grid. If you are creating two surveys drag two If statement blocks onto the grid.
4.Double-click on an If block to open the If Block Properties dialog, and enter information as follows:
| Item | Description |
|---|---|
| Title | Enter a title appropriate to the survey recipients, such as Incident Software Users Survey. |
| And/Or |
Select an appropriate operator. For this example select the And operator. In other instances based on your requirements the Or operator may be more appropriate. |
| Field | Select a parameter from the list for field appropriate or the users receiving the survey. |
| Operator | Select from the list. For this example select Equal To. |
| Value |
Enter a Value. You may need to evaluate which fields in the Incident business object you want to use in order to trigger the survey. For example, to send the survey only to users who have filed an incident about software or desktop issues you may want to select Software Request from the Category picklist or Desktop Service from ActualService. For this example, enter a value from the Category pick list such as Software Request, or an item from the ActualService value pick list such as Data Service or Email Service. |
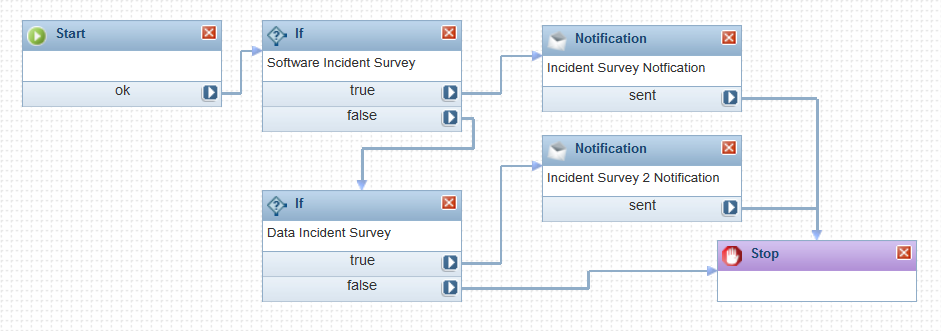
5.Edit the second If block to contain information about the second survey.
6.Connect each If block to a notification block. The configuration should contain "if/then" constraints as seen in the following graphic:
7. Edit the Notification blocks to ensure that the correct survey link appears within each notification email. In the template edit DefaultSurveyName to have the correct survey name.
8.Validate the workflow and click Save when you are done.
Deleting a Survey
You cannot delete a survey that has responses. When you delete a survey from the database, all data related to that survey is also deleted.
1.From the Configuration Console, click Configuration > Communication Templates > Surveys to open the Surveys workspace. The survey list appears.
2.Click the name of the survey to delete. The survey opens.
3.Click Delete Survey at the top of the page.
4.Click OK to confirm the deletion.